ROKR Strolling in the Sunshine Review: Is the LKS01 Worth Building?
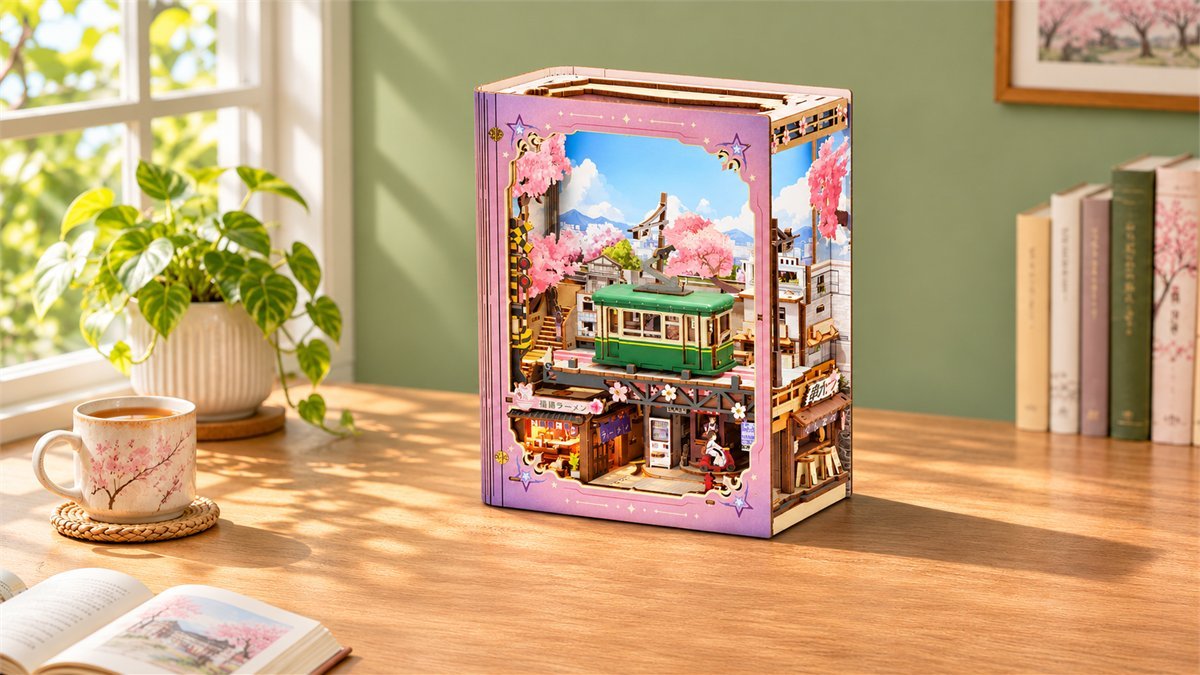
A green tram passes above a row of tiny shops. Cherry blossoms frame the street, and a ramen counter glows below. ROKR’s Strolling in the Sunshine LKS01 brings that little scene into a book-shaped wooden model, then gives you something a static miniature cannot: a reason to stop and watch it.
Is it worth building? LKS01 is a promising choice for a patient miniature enthusiast who wants an interactive display, not just another finished puzzle. Its appeal is the combination of scenery and mechanics. Choose it for a leisurely project with room for adjustments; choose a simpler, nonmotorized kit if an easy first build matters more than movement.
This ROKR Strolling in the Sunshine review brings together the current specifications and early builders’ experiences to help you make that choice. The finished scene has plenty of charm, but the most useful question is whether you will enjoy the work that happens before it reaches your shelf.
The finished scene is what builders keep coming back to
The strongest positive theme in the early accounts is the pleasure of looking into the completed miniature. Community builder Sasa praises its colors, opening front and combination of light, sound and movement. Reddit builder Some1atJersey, who disclosed receiving the kit as an anniversary gift, was enthusiastic about the result and recommended it. These are personal experiences, rather than a large body of long-term reviews, but they help explain the attraction: this is a small scene you can explore, not simply a facade.
That opening front is especially appealing if you enjoy showing someone the details of a build. Instead of pointing through a narrow window, you can bring the lower street into view. For a collector, the satisfaction is not only finishing the last step; it is having a model that invites another look afterward.
Independent builder John A MacInnes also liked the layered design and finished appearance, but his overall verdict was less favorable: splintering, tight joints and backdrop noise meant he would not buy it again. Sasa likewise enjoyed the display while finding parts of assembly frustrating. The cheerful Reddit account described a simpler build, though it too mentioned delicate pieces. The reasonable expectation is an attractive, hands-on project that rewards patience, rather than a guaranteed effortless weekend.
A book nook with more to discover than a pretty front
ROKR combines a moving tram, a scrolling background and circling street-level figures. Opening the hinged cover is a separate interaction: it brings the ramen-shop section into view. That distinction matters. You are buying both a mechanical model to assemble and a miniature street to display.
The design favors someone who likes noticing relationships between parts. A stationary shop makes the passing tram more noticeable; a changing background gives the fixed buildings another layer of depth. You do not have to care about model railways to appreciate it. The appeal is closer to a tiny animated window than a train set with a long track to manage.
Before choosing this particular kit, ask yourself a simple question: would you still like the scene when it is switched off? If the answer is yes, the mechanical effects become a bonus you will enjoy showing people. If only the movement interests you, a model with exposed gears might be more satisfying to inspect.

LKS01 specifications, translated into everyday decisions
| Specification | Manufacturer information | What to plan for |
|---|---|---|
| Model | ROKR LKS01, Strolling in the Sunshine | Check the model code when comparing listings. |
| Piece count | 339 pieces | Keep a dedicated tray or workspace for small components. |
| Assembly estimate | About 8 hours | Allow several sessions, plus time for fitting and checks. |
| Difficulty and age | Advanced; ages 14+ | Better suited to patient builders than a young child’s independent project. |
| Closed dimensions | 100 × 171.5 × 217 mm; approximately 3.9 × 6.8 × 8.5 inches | Measure the display space and leave extra clearance for opening. |
| Power connection | USB Type-C; cable not included | Arrange a suitable cable and nearby power source. |
| Lighting | White streetscape light and warm yellow ramen-shop light | Expect contrasting lighting zones, not uniform brightness everywhere. |
Dimensions, age guidance and the assembly estimate are manufacturer specifications. Eight hours is a planning reference, not a measured completion time from our own build.
A compact finished model can still need a generous work area. Before ordering, think about where the unfinished project will live between sessions. A tray that can stay undisturbed is often more useful than an ambitious plan to finish everything in one sitting. Leave the boards, numbered bags and instructions organized together so the next session starts with building rather than searching.
For a gift, the recipient’s preferred kind of hobby matters more than the number of pieces. Someone who enjoys checking an assembly diagram and making small adjustments may find the mechanics part of the pleasure. Someone who wants a ready-made ornament will receive a substantial task before receiving the decoration.
How to make the assembly more enjoyable
Start with the bags, not the first wooden panel
One particularly useful tip comes from Sasa’s build update: inspect every labeled bag before starting. Her kit included replacement plastic parts whose purpose she noticed only after using the wooden versions. Read any supplementary labels alongside the printed steps. If a bag and the manual seem to disagree, ask support which applies to your kit rather than assuming the extra parts are spares.
This is a batch-specific observation, not proof that every current box has the same instruction mismatch. The useful habit is universal: spend a few minutes checking the contents before a component disappears inside a mechanism. Photographing the labeled bags also gives you a simple reference if you need help later.
Treat resistance as a reason to check, not push harder
The early accounts make gentle handling worth emphasizing. Support a thin part near its connection rather than flexing the whole sheet. If two pieces resist joining, recheck their numbers, orientation and the drawing before applying more pressure. Follow the kit’s own sanding and waxing directions; indiscriminate sanding can alter a fit that was already correct.
MacInnes identifies the alignment of the Z2 plastic cog with the railway bed as important when fitting the tram. Treat that as an owner-reported checkpoint, not an instruction to modify the mechanism. Compare it with your current assembly guide before closing up the surrounding structure.
A sensible work rhythm is to finish one subassembly, inspect it, and then move on. Do not race the advertised build time. Good lighting, a clear surface and a break when your concentration drops cost little, and they make tiny part numbers and orientation changes easier to follow.
Use support for damaged parts or electrical faults
Robotime offers a replacement-parts route for missing, lost or broken components. Keep the model number, affected part numbers and photographs ready. Its policy distinguishes damage discovered on opening the box from damage during assembly; replacement shipping costs and processing arrangements can differ. Check the applicable terms before expecting every replacement to be free.
Sasa also reported a loose switch cable that her partner repaired. That is one account, not an established failure pattern or a repair procedure to copy. If your unit has a loose wire or does not power on, disconnect it and contact support with clear photos. Forcing connectors or improvising an electrical repair is not a useful shortcut to finishing a decorative kit.
The useful detail: music and movement are not all-or-nothing
ROKR’s operating guide describes a top-mounted touch control with several modes. That makes the model more flexible than a display that must play its tune every time it moves.
| Control | Listed behavior | Useful moment |
|---|---|---|
| Tap once | Start lights, music and motion | Show the complete scene to someone. |
| Tap again | Mute music while lights and motion continue | Enjoy the animation without the repeating melody. |
| Double-tap | Pause motion while music and lights remain on | Look at the scenery without moving elements. |
| Press and hold | Switch off | Return to an unpowered display. |
Muting the music does not promise silent mechanics. MacInnes found the moving backdrop louder than he expected; no measured noise level or verified universal fix was available in the evidence reviewed. If your ideal location is beside a very quiet reading chair, consider using the animation for short demonstrations and leaving the model off when you want silence.
There is also a distinction between atmospheric lighting and illuminating every detail. Sasa wanted more light in the lower-right area, and the Reddit builder suggested additional lighting. Before modifying anything, try positioning the finished model where ordinary room light reaches the front. That is a low-risk display adjustment, not a claimed cure for an electrical problem.
Where it will look best, and what to choose instead
A model can fit on a shelf and still be awkward to enjoy there. For LKS01, check three things before choosing its permanent home: whether you can see the front comfortably, reach the top control, and open the cover without moving a stack of books. Leave room for the cable as well. A deep shelf that hides the lower scene may waste the details that attracted you to the kit.
There is no need to give it the busiest corner of the room. A clear patch on a desk or a front-facing position on a bookcase lets the miniature act as a small focal point. Do not use it to support a heavy leaning pile of books simply because it has a book-like shape; this is a display model with delicate moving parts.
If you are deciding between this and a nonmotorized book nook, compare the experience rather than assuming more features always mean better value:
- Choose LKS01 for interaction. It suits someone who wants the assembly challenge and a finished scene to demonstrate.
- Consider a simpler static kit for a first project. Check its actual difficulty and instructions; nonmotorized does not automatically mean easy.
- Choose by the finished subject if you mainly want decor. A scene you love looking at is more important than a specification you rarely use.
For other projects, browse 3D Wooden Puzzle Coupons & Deals in Arts & Crafts. Comparing model size, assembly difficulty and the kind of display you want is a useful way to narrow the choice before comparing prices.
Our verdict: choose it for the miniature, enjoy the mechanics
LKS01 makes the most sense for a patient builder who already likes the Japanese street scene and wants a more interactive project. Its appeal should last beyond the first demonstration because the finished design gives you something to look into, open and share. The early feedback supports that visual appeal, while also making careful preparation a sensible part of the purchase decision.
For a complete beginner, it is a conditional recommendation: choose it if the subject genuinely motivates you and you are comfortable slowing down or seeking help. For a deadline gift that must be assembled in one evening, choose a less involved project. For a miniature enthusiast with an undisturbed workspace, it is a much more natural fit.
Once you have decided the build suits you, check ROBOTIME Coupons & Deals for current offers and their conditions. Compare the final delivered total, not just a discount percentage; an offer is useful only if it applies to the item and order you actually want.
Questions before you start
Is Strolling in the Sunshine the same as Rolife Sunshine Town?
No. This article concerns ROKR LKS01, the mechanical Strolling in the Sunshine model. Do not use reviews or assembly instructions for a similarly named Rolife kit as evidence for this one.
Can a beginner build ROKR LKS01?
A patient beginner may be willing to take it on, but ROKR classifies it as advanced. The important question is whether you are comfortable checking part fit and following a mechanical assembly sequence. A smaller introductory kit is a more forgiving choice for someone who wants quick progress.
Does the eight-hour estimate include adjustments?
It is an approximate manufacturer assembly estimate, not a guaranteed total for every builder. Allow extra time for sorting, checking instructions, careful fitting and any support questions. Plan around completing useful stages rather than beating the clock.
Should I add lights or extra scenery immediately?
Finish and check the standard build first. Then decide whether anything is genuinely missing for your display location. Keep additions away from moving paths, and ask support before changing the electrical setup; a decorative improvement should not prevent the mechanism from working.
Sources
Specifications and control modes were checked against ROKR’s current LKS01 product information and operating guide on November 2, 2026. Builder experiences below concern three distinct people; repeat posts by the same builder are not additional reviews. This is a buying review, not a claim of our own hands-on test.
- Book Nook Workshop: John A MacInnes’s purchased-kit build review, including tram alignment and material observations
- Robotime Community: Sasa’s completed LKS01, display impressions and assembly experience
- Robotime Community: Sasa’s update on labeled replacement parts and a switch-cable issue
- Reddit r/booknooks: Some1atJersey’s completed build and disclosed gifted-kit experience
- Robotime support: replacement-parts requirements and terms
DiscountedSavings may earn a commission from qualifying purchases through product links.